Web Security 24x7

Web Security | Web Hacking | Bug Bounty POC | Web Penetration Testing Tools

Saturday, September 24, 2016

How to Fix the 403 Forbidden Error in WordPress

Are you dealing with the 403 Forbidden error on your WordPress site? It is one of the most dreadful errors that a WordPress beginner can come across. In this article, we will show you how to easily fix the 403 forbidden error in WordPress.

What is a 403 Forbidden – Access Denied Error in WordPress?

WordPress shows codes and messages when an error occurs on your website.

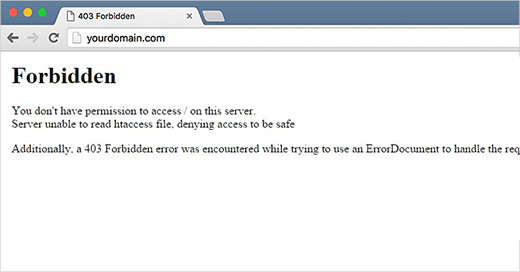
403 Forbidden error code is shown when your server permissions don’t allow access to a specific page.
This is why the error is usually accompanied by the text:
403 Forbidden – You don’t have permission to access ‘/’ on this server.
Additionally, a 403 Forbidden error was encountered while trying to use an ErrorDocument to handle the request.

What Causes 403 Forbidden Error in WordPress?

The most common cause for the 403 Forbidden error in WordPress is due to poorly configured security plugins. Many WordPress security plugins can block an IP address (or a whole range of IP addresses) if they believe them to be malicious.

Fix 403 Forbidden Error Caused by Corrupt .htaccess File


Often the 403 error is caused by a corrupt .htaccess file in your WordPress site. Repairing this file is quite easy.
First you need to connect to your website using a FTP client or file manager in cPanel.
Next, locate the .htaccess file in the root folder of your WordPress site. See this guide if you can’t find .htaccess file in Your WordPress folder.
You need to download the .htaccess file to your computer so that you have a fresh backup of it. After that, you need to delete the file from your server.
Try accessing your website. If 403 forbidden error is resolved, then this means that your .htaccess file was corrupt.

Fix 403 Forbidden Error Caused by File Permissions in WordPress


All files stored on your website have file permissions. These file permissions control who can access files and folders on your website.
Incorrect file permissions can cause 403 forbidden error. It makes your web server thinks that you do not have permission to access those files.
If the above two solutions do not solve the 403 forbidden error on your site, then incorrect file permissions can be the most likely cause.
You can ask your WordPress hosting provider to check your website for correct file permissions. Some hosts are very supportive, they wouldn’t mind and will probably fix that for you.
Changing file permissions yourself can have serious consequences. If you do not feel confident doing it yourself, then ask a friend for help or hire a professional.
However, if you want to do it yourself, then here is how you would check your file permissions.
Simply connect to your WordPress site using an FTP client. Navigate to the root folder containing all your WordPress files.

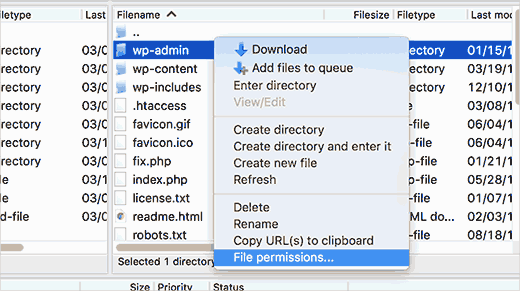
Click to select a folder, right click and then select File Permissions from the menu.
Your FTP client will show you a file permissions dialog box like this:

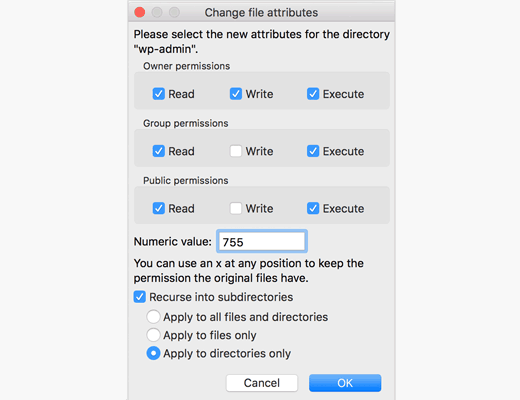
All folders on your WordPress site should have a file permission of 744 or 755.
All files on your WordPress site should have a file permission of 644 or 640.
You can set the file permission to the root folder to 744 or 755. Check the box next to ‘Recurse into subdirectories’ and then check the option that says ‘apply to directories only’.
Click on the OK button. Your FTP client will now start setting permissions to all subdirectories in that folder.
Once it is done, you need to repeat the process for all the files. This time you will use file permission of 644 or 640 and don’t forget to select ‘Recurse into subdirectories’ and ‘apply to files only’. options.
Click on the OK button and your FTP client will start setting file permissions for all the selected files.
Source : http://www.wpbeginner.com/

Sunday, September 18, 2016

YASUO Web Vulnerable Scanner

YASUO

Yasuo is a ruby script that scans for vulnerable 3rd-party web applications.
While working on a network security assessment (internal, external, redteam gigs etc.), we often come across vulnerable 3rd-party web applications or web front-ends that allow us to compromise the remote server by exploiting publicly known vulnerabilities. Some of the common & favorite applications are Apache Tomcat administrative interface, JBoss jmx-console, Hudson Jenkins and so on.
If you search through Exploit-db, there are over 10,000 remotely exploitable vulnerabilities that exist in tons of web applications/front-ends and could allow an attacker to completely compromise the back-end server. These vulnerabilities range from RCE to malicious file uploads to SQL injection to RFI/LFI etc.
Yasuo is built to quickly scan the network for such vulnerable applications thus serving pwnable targets on a silver platter.

Setup / Install

You would need to install the following gems:
  • gem install ruby-nmap net-http-persistent mechanize text-table

Details

Yasuo provides following command-line options:
-r :: If you want Yasuo to perform port scan, use this switch to provide an IP address or IP range or an input file with new-line separated IP addresses
-s :: Provide custom signature file. [./yasuo.rb -s mysignatures.yaml -f nmap.xml] [Default - signatures.yaml]
-f :: If you do not want Yasuo to perform port scan and already have an nmap output in xml format, use this switch to feed the nmap output
-u :: Takes a newline-separated file of URLs saved from previous run of Yasuo. See below for more details.
-n :: Tells Yasuo to not ping the host while performing the port scan. Standard nmap option.
-p :: Use this switch to provide port number(s)/range
-A :: Use this switch to scan all the 65535 ports. Standard nmap option.
-b [all/form/basic] :: If the discovered application implements authentication, use this switch to brute-force the auth. "all" will brute-force both form & http basic auth. "form" will only brute-force form-based auth. "basic" will only brute-force http basic auth.
-t :: Specify maximum number of threads
-h :: Well, take a guess

What is this new switch: --usesavedstate (-u)

When Yasuo runs, it performs several steps before starting to enumerate vulnerable applications. If you provide an IP address or range, it will perform a port scan against the provided targets. If you provide Yasuo with nmap xml output file, it will parse that file and enumerate hosts with open web ports. It then sends a request for a fake (non-existent) file and directory to each enumerated host:ip. To reduce false-positives, it discards all ip:port that respond back with HTTP 200 Ok for the fake file & directory requests. At the end of this whole process, we get a list of, let's say, "good urls". These good urls are then used to enumerate vulnerable applications.
If for some reason, you have to re-run Yasuo against the same set of targets, the previous versions of Yasuo will go through this whole process again. That's not efficient at all. I know, I am mostly dumb and a slow learner but I am constantly evolving. Anyways, a good reason to re-run Yasuo against the same targets could be to use a different (or custom) signatures file.
This latest version of Yasuo will automatically save a file, savedURLstateXXXXX.out, in the same folder it runs from. This file will contain all the "good urls". If you plan to re-run Yasuo on the same targets, just feed this file to Yasuo without the -f or -r options.
Example: ruby yasuo.rb -s my_custom_signatures.yaml -u savedURLstateXXXXX.out
Yasuo will parse this file and start enumerating vulnerable applications against the listed "good urls". Ta-Da.

Examples

./yasuo -r 127.0.0.1 -p 80,8080,443,8443 -b form
The above command will perform port scan against 127.0.0.1 on ports 80, 8080, 443 and 8443 and will brute-force login for all the applications that implement form-based authentication.
./yasuo -f my_nmap_output.xml -b all
The above command will parse the nmap output file "my_nmap_output.xml" and will brute-force login for all the applications that implement form-based and http basic authentication.

Tetris-style Program Flow.

Download link